ROS2 Beginner Workshop
- Author:
Kuan-Ting Lin
- Date:
2025-08-28
1. Shell, Bash, and Linux Basics
A shell is a command-line interface (CLI) that allows users to interact with the operating system’s kernel by typing commands. It interprets these commands and translates them into actions that the system can perform. In Linux environments, the shell is typically text-based, although graphical shells also exist.
bash (Bourne Again Shell) is one of the most widely used shells in Linux and is the default in many distributions.
It provides features such as:
Command history (navigate with ↑ / ↓ arrows)
Tab completion for files and commands
Scripting capabilities with variables, loops, and conditionals
What is a Linux distribution? A Linux distribution (distro) is a complete operating system built around the Linux kernel, packaged with system utilities, libraries, and a package manager. Different distributions vary in design, default tools, and target audience.
Common distributions include:
Ubuntu
Debian
Fedora
Arch Linux
Linux Mint
Why is Ubuntu popular for personal use?
Easy installation with a graphical installer
Good hardware compatibility
Large software repositories
Strong community support
Long-Term Support (LTS) releases for stability
Basic Linux Commands
Below are some commonly used Linux commands with explanations:
cd ~/ros2_ws
Note
Changes the current directory to ~/ros2_ws.
The ~ symbol represents the current user’s home directory.
Example: cd /var/log navigates to /var/log.
mkdir my_folder
Note
Creates a new directory named my_folder.
Example: mkdir -p /tmp/test/data creates nested directories if they don’t exist.
ls
Note
Lists files and directories in the current location.
ls -l shows detailed information (permissions, owner, size, modification date).
ls -a includes hidden files (those starting with .).
echo "Hello"
Note
Prints the text Hello to the terminal.
You can also redirect output: echo "Hello" > file.txt writes Hello to file.txt.
pwd
Note
Displays the full path of the current working directory.
Useful for confirming your location in the file system.
touch word.txt
Note
Creates an empty file named word.txt.
rm word.txt
Note
Removes the file word.txt.
Use rm -r folder to delete a folder and its contents (use with caution).
chmod +x filename.py
Note
Adds execute (x) permission for all users to filename.py, making it runnable (e.g., ./filename.py).
u= user (owner),g= group,o= others,a= allr= read,w= write,x= execute
You can combine these flags (like u+x, g-w) to control permissions for specific users.
2. ROS 2 Environment Setup
ROS 2 relies on combining workspaces using the shell environment. To use ROS 2, “source” a setup file (Linux):
source /opt/ros/humble/setup.bash
Make sourcing permanent:
echo "source /opt/ros/humble/setup.bash" >> ~/.bashrc
Check your ROS environment:
printenv | grep -i ROS
Output example:
ROS_VERSION=2
ROS_DISTRO=humble
ROS_PYTHON_VERSION=3
3. Using turtlesim, ros2, and rqt
turtlesim is a simple simulator to help you learn core ROS 2 ideas.
Install turtlesim:
sudo apt update
sudo apt install ros-humble-turtlesim
Check install:
ros2 pkg executables turtlesim
Output:
turtlesim draw_square
turtlesim mimic
turtlesim turtle_teleop_key
turtlesim turtlesim_node
Run turtlesim:
ros2 run turtlesim turtlesim_node
Output:
[INFO] [turtlesim]: Starting turtlesim with node name /turtlesim
[INFO] [turtlesim]: Spawning turtle [turtle1] at x=[5.544445], y=[5.544445], theta=[0.000000]
Open a new terminal and run:
ros2 run turtlesim turtle_teleop_key
You will now see the turtle moving in the window as you use arrow keys.
Note
Pressing an arrow key only moves the turtle briefly (robot safety pattern).
To see the ROS graph:
ros2 node list
ros2 topic list
ros2 service list
ros2 action list
Install and run rqt for GUI tools:
sudo apt install '~nros-humble-rqt*'
rqt
4. Understanding Nodes
A node is a fundamental process that does some work in ROS 2. Each node in ROS should be responsible for a single, modular purpose, e.g. controlling the wheel motors or publishing the sensor data from a laser range-finder. Each node can send and receive data from other nodes via topics, services, actions, or parameters.

Run two nodes (turtlesim + teleop):
ros2 run turtlesim turtlesim_node
ros2 run turtlesim turtle_teleop_key
List nodes:
ros2 node list
Output:
/turtlesim
/teleop_turtle
Remap node name:
ros2 run turtlesim turtlesim_node --ros-args --remap __node:=my_turtle
List after remap:
ros2 node list
Output:
/my_turtle
/turtlesim
/teleop_turtle
Node info:
ros2 node info /my_turtle
Output (truncated):
/my_turtle
Subscribers:
  /parameter_events: rcl_interfaces/msg/ParameterEvent
  /turtle1/cmd_vel: geometry_msgs/msg/Twist
Publishers:
  /parameter_events: rcl_interfaces/msg/ParameterEvent
  /rosout: rcl_interfaces/msg/Log
  /turtle1/color_sensor: turtlesim/msg/Color
  /turtle1/pose: turtlesim/msg/Pose
Service Servers:
  /clear: std_srvs/srv/Empty
  /kill: turtlesim/srv/Kill
  /my_turtle/describe_parameters: rcl_interfaces/srv/DescribeParameters
  /my_turtle/get_parameter_types: rcl_interfaces/srv/GetParameterTypes
  /my_turtle/get_parameters: rcl_interfaces/srv/GetParameters
  /my_turtle/list_parameters: rcl_interfaces/srv/ListParameters
  /my_turtle/set_parameters: rcl_interfaces/srv/SetParameters
  /my_turtle/set_parameters_atomically: rcl_interfaces/srv/SetParametersAtomically
  /reset: std_srvs/srv/Empty
  /spawn: turtlesim/srv/Spawn
  /turtle1/set_pen: turtlesim/srv/SetPen
  /turtle1/teleport_absolute: turtlesim/srv/TeleportAbsolute
  /turtle1/teleport_relative: turtlesim/srv/TeleportRelative
Service Clients:

Action Servers:
  /turtle1/rotate_absolute: turtlesim/action/RotateAbsolute
Action Clients:
5. Understanding Topics
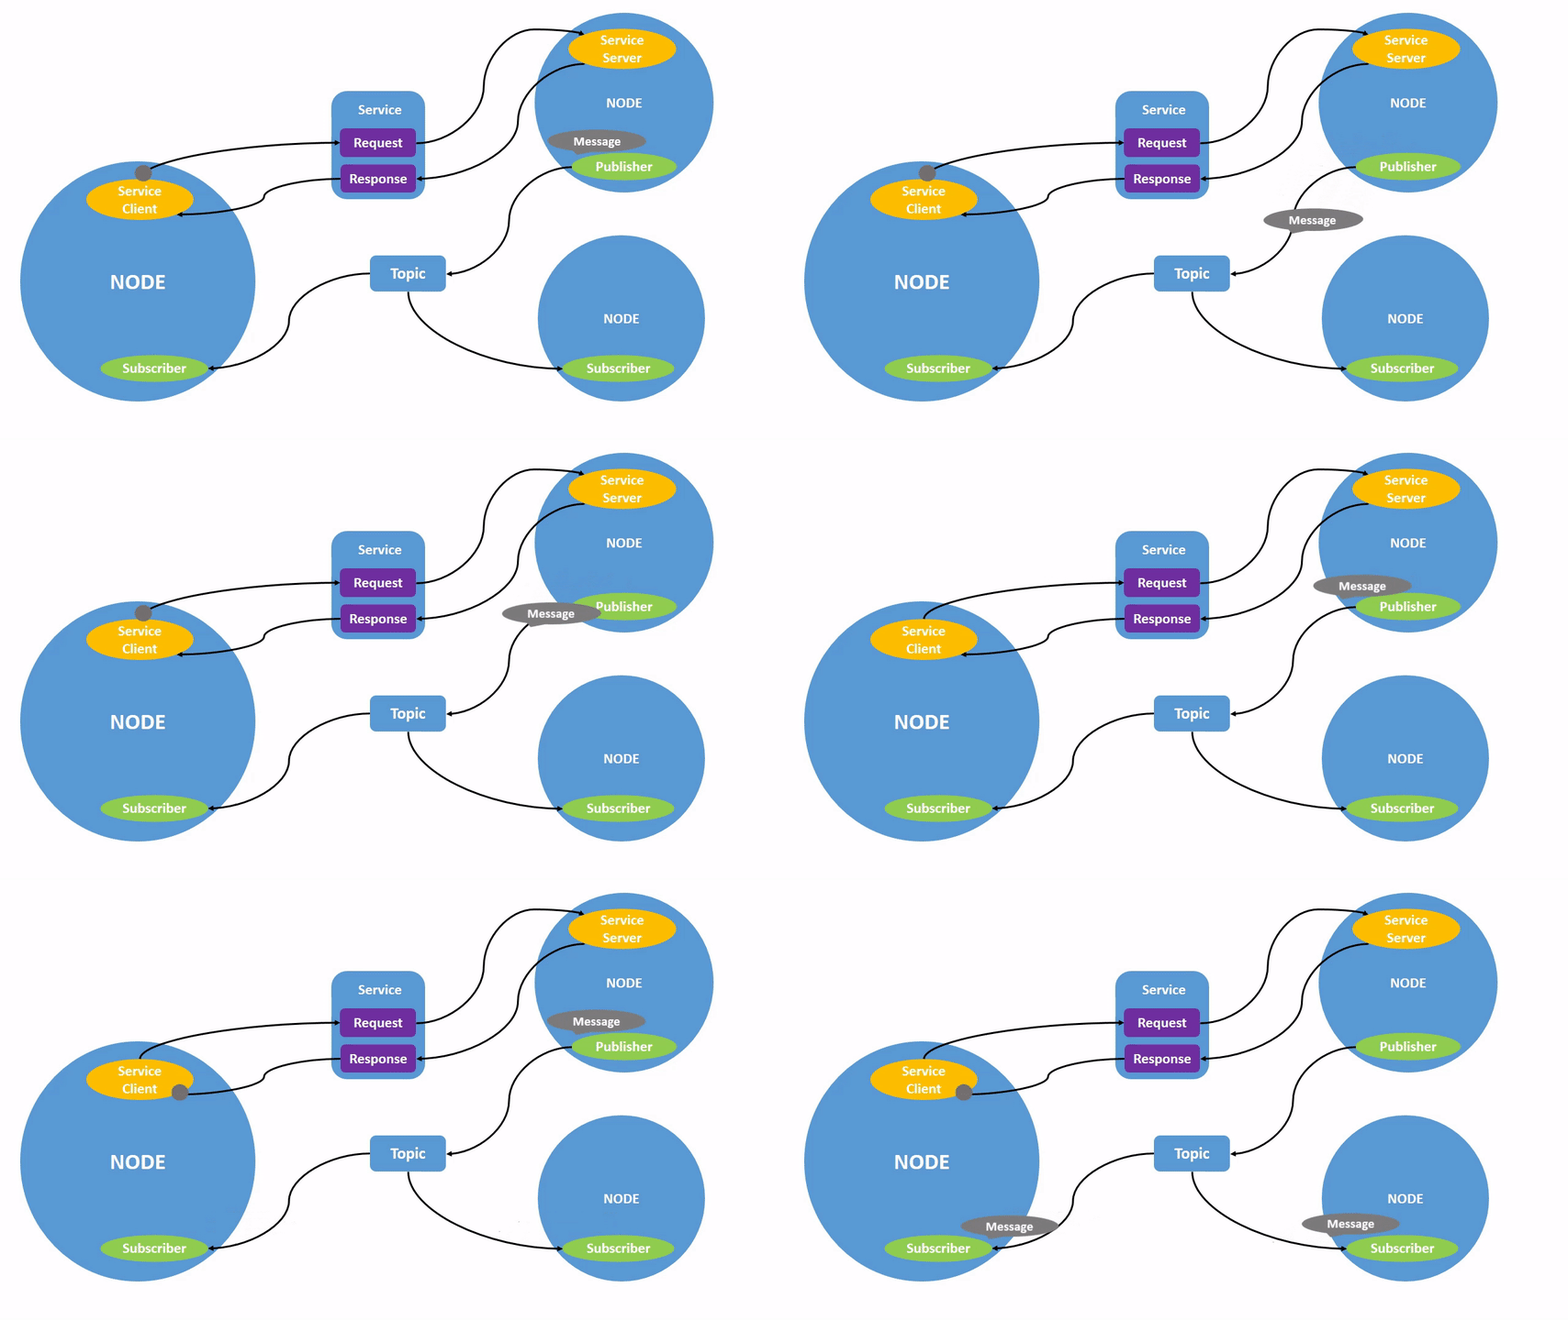
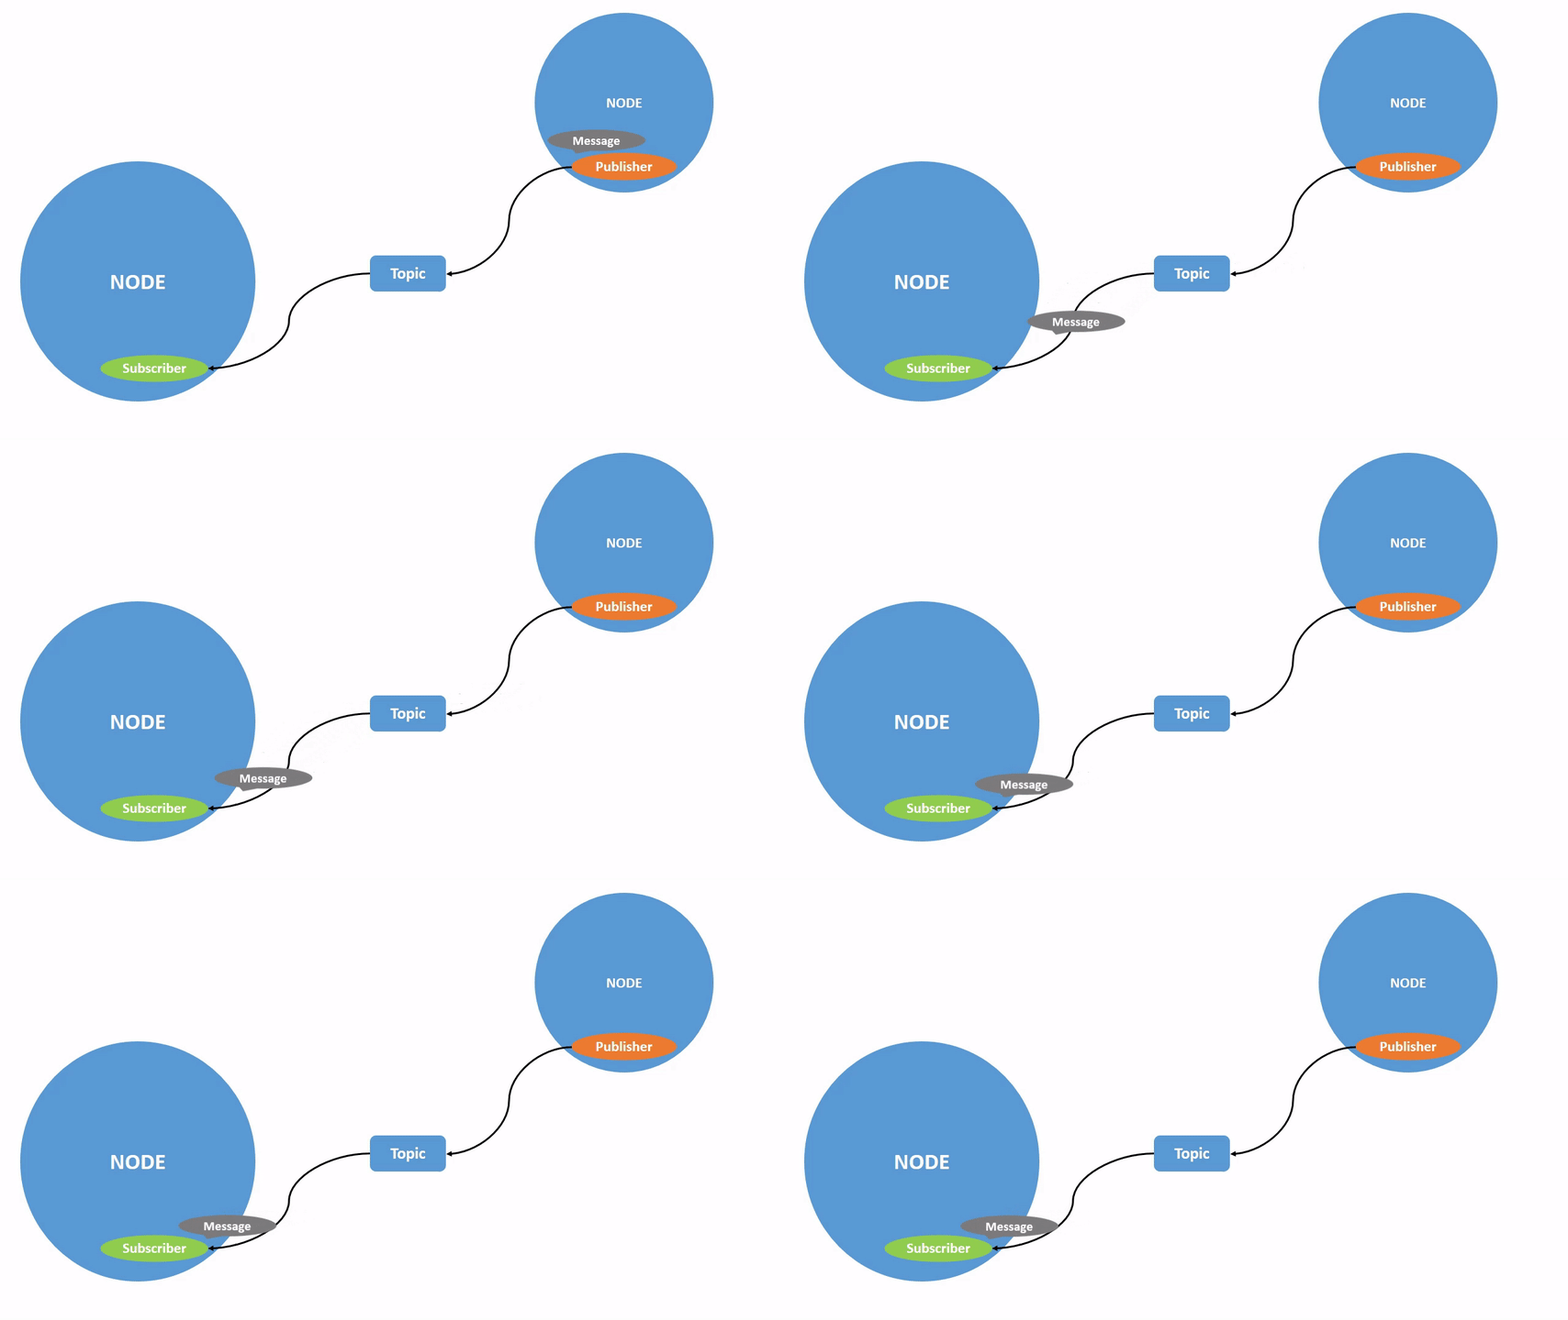
A topic is a channel for message passing between nodes.
A node may publish data to any number of topics and simultaneously have subscriptions to any number of topics.

List topics:
ros2 topic list
Output:
/parameter_events
/rosout
/turtle1/cmd_vel
/turtle1/color_sensor
/turtle1/pose
List topics with type:
ros2 topic list -t
Output:
/parameter_events [rcl_interfaces/msg/ParameterEvent]
/rosout [rcl_interfaces/msg/Log]
/turtle1/cmd_vel [geometry_msgs/msg/Twist]
/turtle1/color_sensor [turtlesim/msg/Color]
/turtle1/pose [turtlesim/msg/Pose]
Show messages on a topic (nothing shows until you move the turtle!):
ros2 topic echo /turtle1/cmd_vel
Output example when moving:
linear:
  x: 2.0
  y: 0.0
  z: 0.0
angular:
  x: 0.0
  y: 0.0
  z: 0.0
---
ros2 topic pub <topic_name> <msg_type> '<args>'
The '<args>' argument is the actual data you’ll pass to the topic, in the structure you just discovered in the previous section.
The turtle (and commonly the real robots which it is meant to emulate) require a steady stream of commands to operate continuously. So, to get the turtle moving, and keep it moving, you can use the following command. It’s important to note that this argument needs to be input in YAML syntax. Input the full command like so:
Publish a message (repeat):
ros2 topic pub /turtle1/cmd_vel geometry_msgs/msg/Twist "{linear: {x: 2.0}, angular: {z: 1.8}}"
With no command-line options, ros2 topic pub publishes the command in a steady stream at 1 Hz.
Publish once:
ros2 topic pub --once -w 2 /turtle1/cmd_vel geometry_msgs/msg/Twist "{linear: {x: 2.0}, angular: {z: 1.8}}"
--once is an optional argument meaning “publish one message then exit”.
-w 2 is an optional argument meaning “wait for two matching subscriptions”.
This is needed because we have both turtlesim and the topic echo subscribed.
Topic info:
ros2 topic info /turtle1/cmd_vel
Output:
Type: geometry_msgs/msg/Twist
Publisher count: 1
Subscription count: 2
Show message structure (type):
ros2 interface show geometry_msgs/msg/Twist
Output:
Vector3  linear
  float64 x
  float64 y
  float64 z
Vector3  angular
  float64 x
  float64 y
  float64 z
View topic publish rate:
ros2 topic hz /turtle1/pose
Output:
average rate: 59.354
  min: 0.005s max: 0.027s std dev: 0.00284s window: 58
View topic bandwidth:
ros2 topic bw /turtle1/pose
Output:
1.51 KB/s from 62 messages
  Message size mean: 0.02 KB min: 0.02 KB max: 0.02 KB
Find all topics by type:
ros2 topic find geometry_msgs/msg/Twist
Output:
/turtle1/cmd_vel
6. Understanding Services
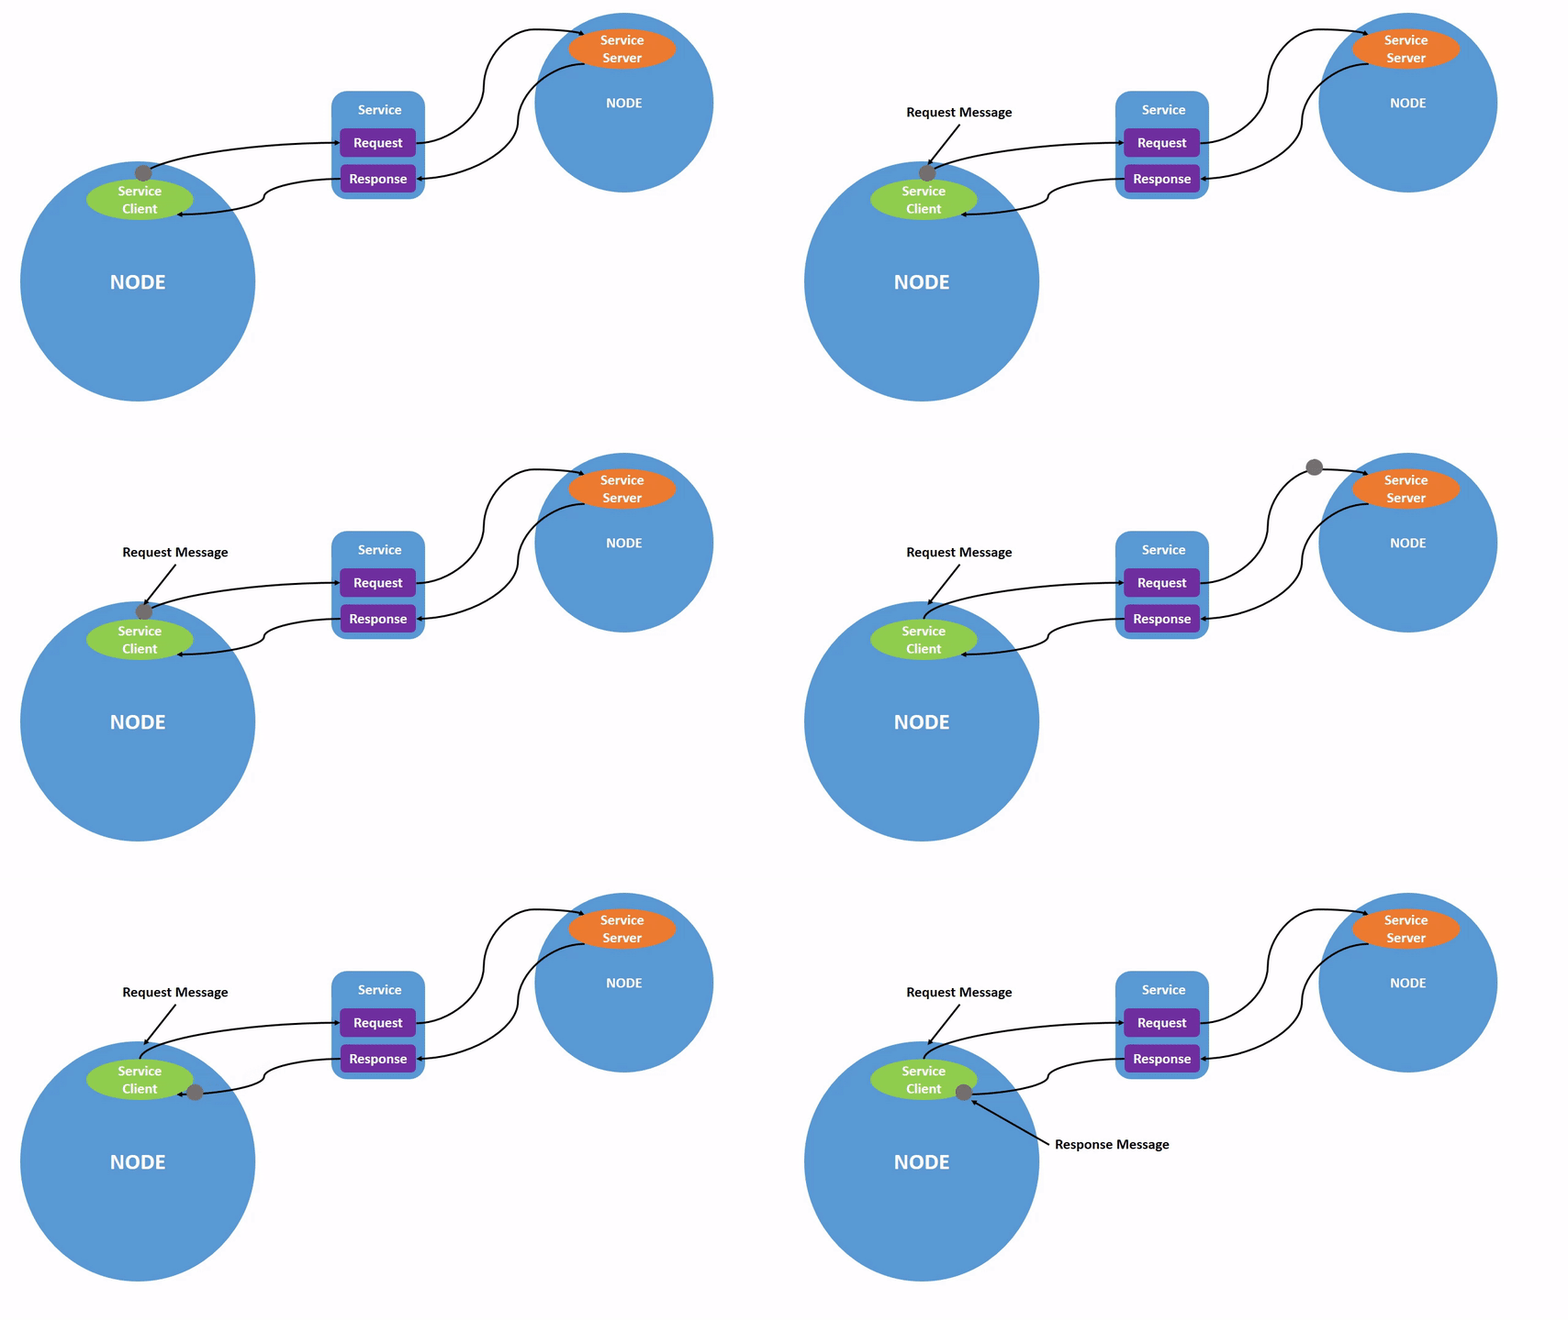
A service is a call-response (client-server) mechanism.

List all services:
ros2 service list
Output:
/clear
/kill
/reset
/spawn
...
/turtle1/set_pen
Show service type:
ros2 service type /clear
Output:
std_srvs/srv/Empty
List all services and types:
ros2 service list -t
Output (truncated):
/clear [std_srvs/srv/Empty]
/spawn [turtlesim/srv/Spawn]
/turtle1/set_pen [turtlesim/srv/SetPen]
Introspect service type structure:
ros2 interface show turtlesim/srv/Spawn
Output:
float32 x
float32 y
float32 theta
string name
---
string name
Call service (/clear):
You can call a service using:
ros2 service call <service_name> <service_type> <arguments>
The <arguments> part is optional.
For example, you know that Empty typed services don’t have any arguments:
ros2 service call /clear std_srvs/srv/Empty
Output (turtlesim window will clear and…)
(No output unless error; window clears)
Call service (/spawn):
Input <arguments> in a service call from the command-line need to be in YAML syntax.
ros2 service call /spawn turtlesim/srv/Spawn "{x: 2, y: 2, theta: 0.2, name: ''}"
Output:
requester: making request: turtlesim.srv.Spawn_Request(x=2.0, y=2.0, theta=0.2, name='')
response:
turtlesim.srv.Spawn_Response(name='turtle2')
Find all Empty services:
ros2 service find std_srvs/srv/Empty
Output:
/clear
/reset
7. Understanding Parameters
A parameter is a configurable value for a node.
List all parameters:
ros2 param list
Output:
/teleop_turtle:
  scale_angular
  scale_linear
  use_sim_time
/turtlesim:
  background_b
  background_g
  background_r
  use_sim_time
Get parameter value:
ros2 param get /turtlesim background_g
Output (e.g.):
Integer value is: 86
Set parameter:
ros2 param set /turtlesim background_r 150
Output:
Set parameter successful
Dump parameters:
ros2 param dump /turtlesim > turtlesim.yaml
Load parameters:
ros2 param load /turtlesim turtlesim.yaml
Output:
Set parameter background_b successful
Set parameter background_g successful
Set parameter background_r successful
Run node with parameter file:
ros2 run turtlesim turtlesim_node --ros-args --params-file turtlesim.yaml
8. Understanding Actions
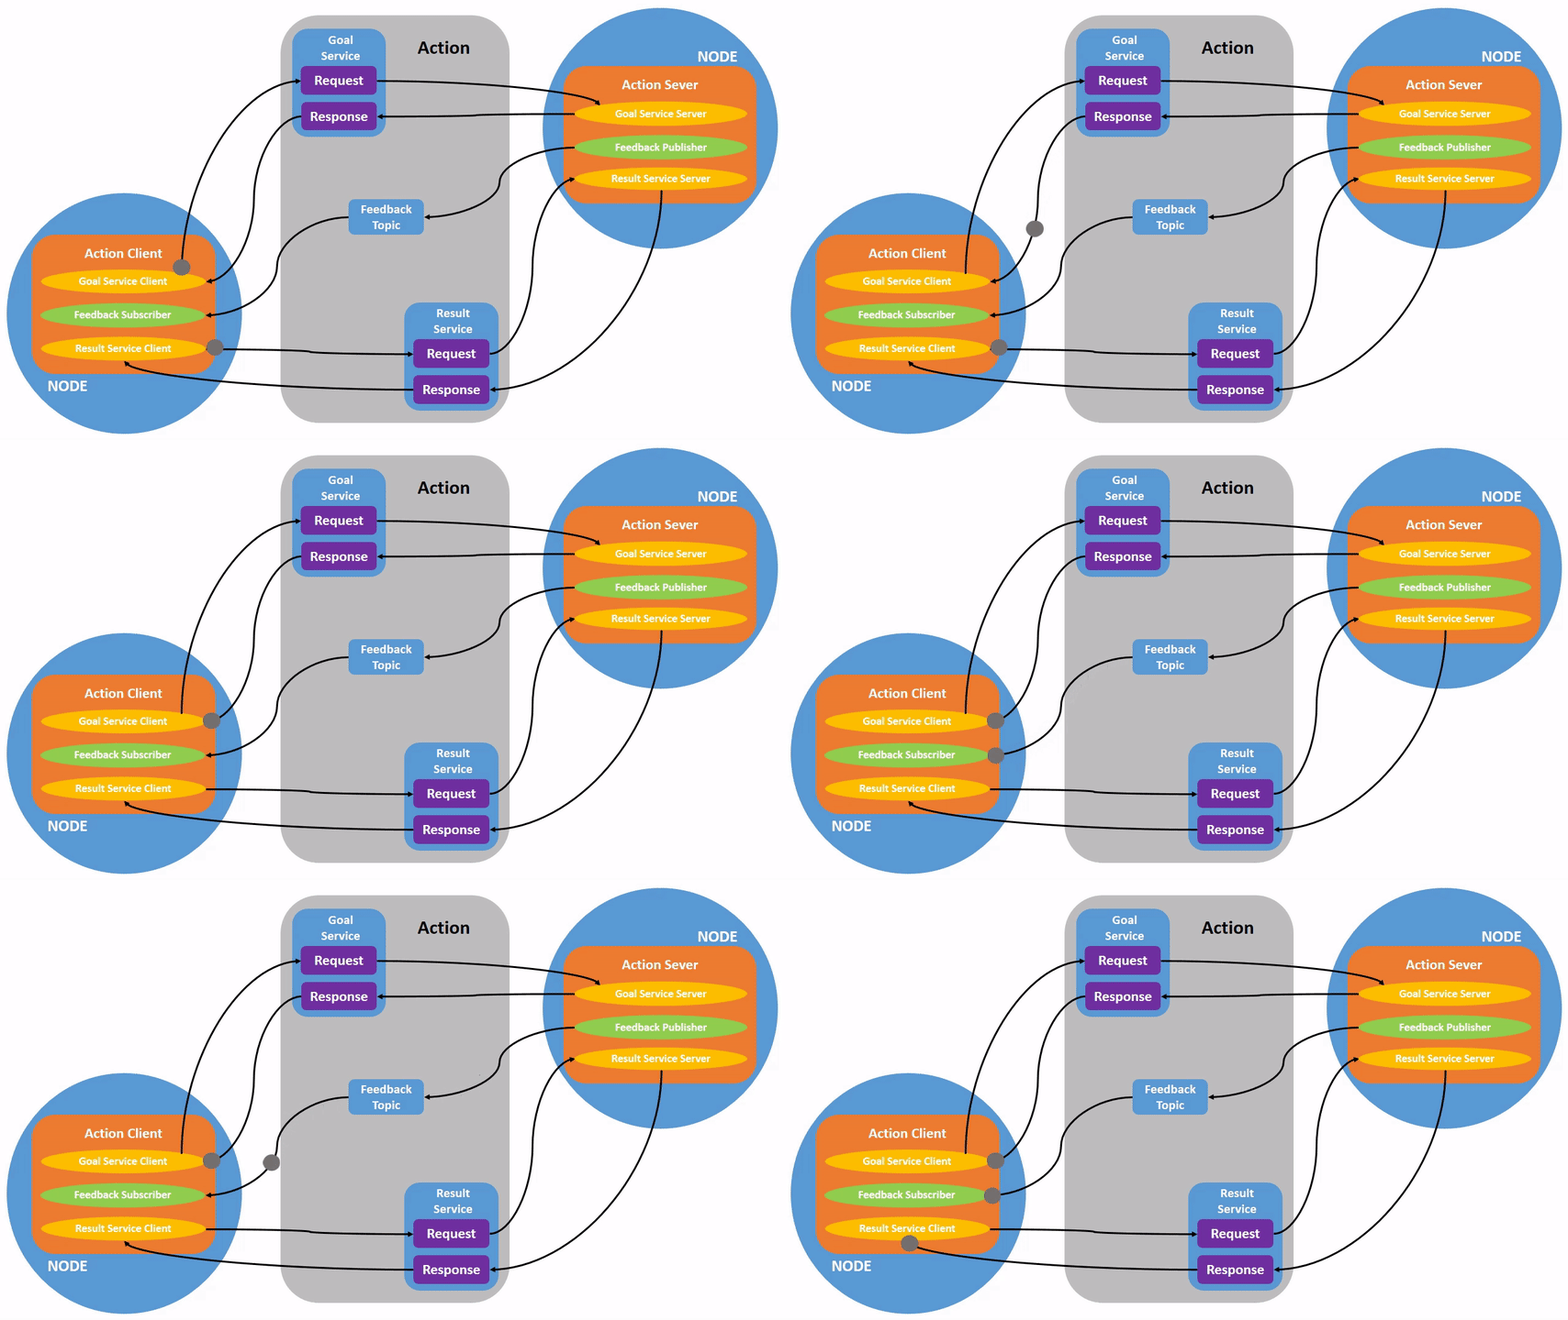
Actions handle long-running, cancelable goals and provide feedback.

See action features in teleop_turtle node:
Output (when you run teleop):
Use arrow keys to move the turtle.
Use G|B|V|C|D|E|R|T keys to rotate to absolute orientations. 'F' to cancel a rotation.
List actions:
ros2 action list
Output:
/turtle1/rotate_absolute
Show action type:
ros2 action list -t
Output:
/turtle1/rotate_absolute [turtlesim/action/RotateAbsolute]
Action info:
ros2 action info /turtle1/rotate_absolute
Output:
Action: /turtle1/rotate_absolute
Action clients: 1
  /teleop_turtle
Action servers: 1
  /turtlesim
Show action message structure:
ros2 interface show turtlesim/action/RotateAbsolute
Output:
# The desired heading in radians
float32 theta
---
# The angular displacement in radians to the starting position
float32 delta
---
# The remaining rotation in radians
float32 remaining
Send action goal:
Let’s send an action goal from the command line with the following syntax:
ros2 action send_goal <action_name> <action_type> <values>
<values> need to be in YAML format.
Keep an eye on the turtlesim window, and enter the following command into your terminal:
ros2 action send_goal /turtle1/rotate_absolute turtlesim/action/RotateAbsolute "{theta: 1.57}"
Output:
Sending goal:
   theta: 1.57

Goal accepted with ID: f8db8f44410849eaa93d3feb747dd444

Result:
  delta: -1.568000316619873
Goal finished with status: SUCCEEDED
Send action goal with feedback:
ros2 action send_goal /turtle1/rotate_absolute turtlesim/action/RotateAbsolute "{theta: -1.57}" --feedback
Output:
Feedback:
  remaining: -3.1268222332000732
Feedback:
  remaining: -3.1108222007751465
...

Result:
  delta: 3.1200008392333984
Goal finished with status: SUCCEEDED
9. Recording and Playing Back Data with ros2 bag
ros2 bag can record and replay data from topics.
Create directory for bag files:
mkdir bag_files
cd bag_files
Record a topic:
ros2 bag record /turtle1/cmd_vel
Output:
[INFO] [rosbag2_storage]: Opened database 'rosbag2_YYYY_MM_DD-HH_MM_SS'.
[INFO] [rosbag2_transport]: Subscribed to topic '/turtle1/cmd_vel'
Record multiple topics with custom name:
You can also record multiple topics, as well as change the name of the file ros2 bag saves to.
Run the following commands:
ros2 bag record -o subset /turtle1/cmd_vel /turtle1/pose
Output:
[INFO] [rosbag2_storage]: Opened database 'subset'.
[INFO] [rosbag2_transport]: Listening for topics...
[INFO] [rosbag2_transport]: Subscribed to topic '/turtle1/cmd_vel'
[INFO] [rosbag2_transport]: Subscribed to topic '/turtle1/pose'
[INFO] [rosbag2_transport]: All requested topics are subscribed. Stopping discovery...
The -o option allows you to choose a unique name for your bag file.
The following string, in this case subset, is the file name.
To record more than one topic at a time, simply list each topic separated by a space. In this case, the command output above confirms that both topics are being recorded.
Stop recording: (Ctrl+C)
Bag info:
ros2 bag info subset
Output (truncated):
Files:             subset.db3
Bag size:          228.5 KiB
Duration:          48.47s
Topic information: ...
  /turtle1/cmd_vel | Type: geometry_msgs/msg/Twist | Count: 9
  /turtle1/pose    | Type: turtlesim/msg/Pose      | Count: 3004
Play bag:
ros2 bag play subset
Check publish rate:
ros2 topic hz /turtle1/pose
10. Create and Set Up a ROS2 Workspace
This section describes how to install Colcon (the ROS2 build tool), enable autocompletion, and set up your first ROS2 workspace with proper environment sourcing.
Step-by-Step Setup
Install Colcon and Extensions
sudo apt update
sudo apt install python3-colcon-common-extensions
Note
sudo apt updateupdates the package list from repositories.sudo apt install python3-colcon-common-extensionsinstalls colcon and helpful extensions.
Enable Colcon Command Autocompletion
cd /usr/share/colcon_argcomplete/hook
ls
Note
Check for the
colcon-argcomplete.bashscript in this directory for shell autocompletion.
Add the following to your ~/.bashrc (open with e.g., gedit):
source /usr/share/colcon_argcomplete/hook/colcon-argcomplete.bash
Or you can use this line:
echo "source /usr/share/colcon_argcomplete/hook/colcon-argcomplete.bash" >> ~/.bashrc
Then reload your bash configuration:
source ~/.bashrc
Note
After this, colcon tab-completion will be available in new terminals.
Create the Workspace Directory Structure
mkdir -p ~/ros2_ws/src
cd ~/ros2_ws
Note
mkdir -pcreates the directory tree for your workspace and itssrcfolder.cd ~/ros2_wsmoves you into your workspace.
Build the Empty Workspace
colcon build
Note
Runs colcon to create initial build infrastructure even when no packages are present.
Generates
build,install, andlogfolders.
Source the Local Workspace
source ~/ros2_ws/install/setup.bash
Note
This overlays your workspace’s packages in the environment for the current shell session.
Make Environment Changes Persistent
At the end of your ~/.bashrc file, add these lines if not already present:
source /opt/ros/humble/setup.bash
source /usr/share/colcon_argcomplete/hook/colcon-argcomplete.bash
source ~/ros2_ws/install/setup.bash
Note
These lines ensure ROS 2 and colcon functions and your workspace are always set up in every new shell.
You are now ready to create ROS2 packages in your own workspace!
11. Create a ROS2 Python Package
Follow these steps to create a new ROS2 Python package, optionally explore it in VS Code, and confirm that it is registered after building.
Step-by-Step Setup
Move to the src Directory
cd ~/ros2_ws/src
Note
Switch into the
srcfolder within your workspace, where all your ROS2 source code packages should be created.
Create a New Python Package
ros2 pkg create my_robot_controller --build-type ament_python --dependencies rclpy
Note
ros2 pkg creategenerates a ROS2 package namedmy_robot_controller.The option
--build-type ament_pythonindicates this is a Python package.--dependencies rclpyadds the ROS2 Python client library as a required dependency.
(Optional) Install and Launch Visual Studio Code for Exploring the Package
sudo snap install code --classic
code .
Note
The first command installs VS Code using snap (if you don’t already have it).
code .opens the current folder in VS Code to allow you to visually inspect package contents and structure.
(Recommended) Install the ROS Extension for VS Code
After launching VS Code, it is highly recommended to install the official ROS extension for better development experience.
Click the Extensions icon (or press
Ctrl+Shift+X).Search for
ROS.Find the ROS extension published by Microsoft (with the blue dots as icon).
Click Install.
Note
This extension adds features like syntax highlighting, launch/URDF/parameter file support, convenient commands for building/running/testing, code navigation, and many other ROS-specific tools right inside VS Code.
Go Back to the Workspace Root and Build the Package
cd ~/ros2_ws
colcon build
Note
cd ~/ros2_wsreturns to the base workspace directory.colcon buildcompiles and installs all packages insrc, including your new Python package.
Verify the Package Is Installed
cd install
ls
Note
In the
installdirectory, you should see a new folder namedmy_robot_controller.This confirms your newly created package was built and registered by the build system.
You are now ready to write Python nodes in your custom package!
12. Write a ROS2 Publisher with Python
This section explains how to write and run a simple ROS2 publisher node in Python to control the turtlesim robot in a circle.
Step-by-Step Setup
Move to the Package’s Source Folder and Create the Node Script
cd ~/ros2_ws/src/my_robot_controller/my_robot_controller
touch draw_circle.py
chmod +x draw_circle.py
Note
Enter the Python package directory (same name as the package).
Use
touchto create a new scriptdraw_circle.py.chmod +xmakes the script executable.
Write the Publisher Node Code
#!/usr/bin/env python3
import rclpy
from rclpy.node import Node
from geometry_msgs.msg import Twist

class DrawCircleNode(Node):
    def __init__(self):
        super().__init__("draw_circle")
        self.cmd_vel_pub = self.create_publisher(Twist, "/turtle1/cmd_vel", 10)
        self.timer = self.create_timer(0.5, self.send_velocity_command)
        self.get_logger().info("Draw circle node has been started")

    def send_velocity_command(self):
        msg = Twist()
        msg.linear.x = 2.0
        msg.angular.z = 1.0
        self.cmd_vel_pub.publish(msg)

def main(args=None):
    rclpy.init(args=args)
    node = DrawCircleNode()
    rclpy.spin(node)
    rclpy.shutdown()

if __name__ == '__main__':
    main()
Note
#!/usr/bin/env python3: Shebang line to allow running script as an executable.import rclpy: Main ROS2 Python library.from rclpy.node import Node: Import ROS2 Node base class.from geometry_msgs.msg import Twist: Import Twist message type (for velocity commands).class DrawCircleNode(Node): Define a new ROS2 node.self.create_publisher(...): Create a publisher for/turtle1/cmd_veltopic.self.create_timer(0.5, ...): Set up a timer to callsend_velocity_command()every 0.5 seconds.send_velocity_command(): Create and publish a Twist message with linear and angular velocities to describe a circle.The
mainfunction initializes ROS2, starts the node, and keeps it spinning.
Add Dependencies to package.xml
<depend>rclpy</depend>
<depend>geometry_msgs</depend>
<depend>turtlesim</depend>
Note
Declare node’s ROS2 and message dependencies for build and run.
Update setup.py to Register the Entry Point
entry_points={
    'console_scripts': [
        "draw_circle = my_robot_controller.draw_circle:main"
    ],
},
Note
This makes your script runnable by
ros2 run.
Build the Package and Source Your Workspace
cd ~/ros2_ws
colcon build --symlink-install
source ~/.bashrc
Note
Builds your package and allows immediate source code changes to take effect (symlink mode).
Sourcing
.bashrcensures terminal picks up new executables.
Run the Publisher Node
ros2 run turtlesim turtlesim_node
ros2 run my_robot_controller draw_circle
Note
You should see the turtle moving in a circle in the turtlesim window, indicating your velocity publisher is working!
13. Write a ROS2 Subscriber with Python
This section shows how to write and run a simple ROS2 subscriber node in Python to listen to the turtle’s pose.
Step-by-Step Setup
Create the Subscriber Script
cd ~/ros2_ws/src/my_robot_controller/my_robot_controller
touch pose_subscriber.py
chmod +x pose_subscriber.py
Note
Enter the Python package directory.
Use
touchto createpose_subscriber.py.chmod +xmakes it executable.
Write the Subscriber Node Code
#!/usr/bin/env python3
import rclpy
from rclpy.node import Node
from turtlesim.msg import Pose

class PoseSubscriberNode(Node):
    def __init__(self):
        super().__init__("pose_subscriber")
        self.pose_subscriber = self.create_subscription(
            Pose, "/turtle1/pose", self.pose_callback, 10)

    def pose_callback(self, msg: Pose):
        self.get_logger().info(str(msg))

def main(args=None):
    rclpy.init(args=args)
    node = PoseSubscriberNode()
    rclpy.spin(node)
    rclpy.shutdown()

if __name__ == '__main__':
    main()
Note
#!/usr/bin/env python3: Shebang line for executability.from turtlesim.msg import Pose: Import the message type for the turtle’s pose.self.create_subscription(Pose, "/turtle1/pose", ...): Subscribe to the pose topic.The callback logs the full pose data to the terminal.
Register the Subscriber Node in setup.py
entry_points={
    'console_scripts': [
        "draw_circle = my_robot_controller.draw_circle:main",
        "pose_subscriber = my_robot_controller.pose_subscriber:main",
    ],
},
Note
Make sure each entry in the list is separated by a comma, and it is a good practice to also add a comma after the last entry. This avoids syntax errors if you add more nodes in the future.
With this format, both
ros2 run my_robot_controller draw_circleandros2 run my_robot_controller pose_subscriberwill be properly registered and executable.
Build and Source the Workspace
cd ~/ros2_ws
colcon build --symlink-install
source ~/.bashrc
Note
Rebuild after any code changes.
Symlink install lets you test edits without reinstalling each time.
Sourcing the workspace updates your environment.
Run the Subscription System
Open three terminals and run:
1st terminal: Start turtlesim
ros2 run turtlesim turtlesim_node
2nd terminal: Start the publisher node
ros2 run my_robot_controller draw_circle
3rd terminal: Start the subscriber node
ros2 run my_robot_controller pose_subscriber
Note
The subscriber terminal will show live pose messages from turtlesim as the turtle moves in a circle.
Summary
You learned shell and Linux command basics.
Set up and checked a working ROS 2 environment.
Used turtlesim/rqt to demonstrate all core ROS 2 CLI tools and concepts.
Key commands and feedback (output) for nodes, topics, services, parameters, actions, and bagging.
References
ROS 2 Humble official docs: https://docs.ros.org/en/humble/index.html
ROS 2 tutorials (YouTube): https://www.youtube.com/playlist?list=PLLSegLrePWgJudpPUof4-nVFHGkB62Izy
How to install ROS2 on Ubuntu 22.04 using VirtualBox: https://www.youtube.com/watch?v=jm8WMgwu10s&ab_channel=maiaVRobotics