Docker
- Author:
Jack Lo
- Date:
2025-08-07
Introduction
Goal: Learn the basics of Docker, understand images vs containers, and run your first custom container with runtime configurations for graphical applications.
Duration: Around 1 hour including demonstrations.
Assumptions: A Linux system (also tested on WSL2), preferably Ubuntu 24.04.
Warning
Though Docker can be run on Windows and macOS as well, but their setup might differ and will not be covered in this workshop.
0. Motivation
In modern software development and deployment, developers face several challenges:
“It works on my machine” problem
Applications often fail when moved from one machine to another
Environment inconsistencies cause bugs that are hard to reproduce
Complex Dependency Management
Applications may depend on specific versions of Python, ROS, or system libraries (things installed via
apt)Installing and updating dependencies on different machines can break existing setups
Resource Inefficiency with Virtual Machines
Virtual machines (VMs) are heavy:
Each VM has its own operating system
Startup times are slow
Storage footprint is large (GBs per VM)
Running multiple VMs on a single machine quickly consumes CPU and memory
How Docker Solves These
Lightweight and Fast
Containers share the host OS kernel
Start in seconds instead of minutes
Consistent and Portable
The same Docker image runs everywhere: local machine, cloud, or production servers
Eliminates environment drift between developers and deployment
Efficient Resource Usage
Containers are smaller than VMs (MBs vs GBs)
Multiple containers can run on the same machine with less overhead
Note
Docker does not replace virtual machines entirely, but provides a more efficient and reproducible approach for most application deployments.
What does it Mean for Us?
Faster Deployment: Applications can be deployed quickly and reliably across different environments.
For example, you can setup a Mincecraft server in one command:
docker run -d -it -p 25565:25565 -e EULA=TRUE itzg/minecraft-server
Reproducibility: Ensures that the application behaves the same way in development, testing, and production. What works on your machine will also work on the robot.
Isolation: Containers provide isolated environments for applications, ensuring that dependencies and configurations do not interfere with each other. And when the development environment in a container is corrupted, it can be easily recreated by deleting the container and starting a new one.
Note
Although Docker is typically used for deploying applications, in Robot Group we use it to set up development environments for robotics applications such as ROS, NVIDIA Isaac Sim and more. As a result, the environment setup inside the container may differ quite a bit from the image.
1. So What Exactly is Docker?
Docker allows you to package an application and all its dependencies into a single, portable unit called a container. This process is known as containerization.
What is Containerization?
Containerization is the process of bundling:
Application code
Runtime environment (e.g., Python, ROS)
System libraries and dependencies
Configuration files
These are packaged into a Docker image.
When the image is executed, Docker creates an isolated container that runs the application exactly the same on any host.
Architecture of Docker
Docker uses a client-server architecture to manage and run containers.
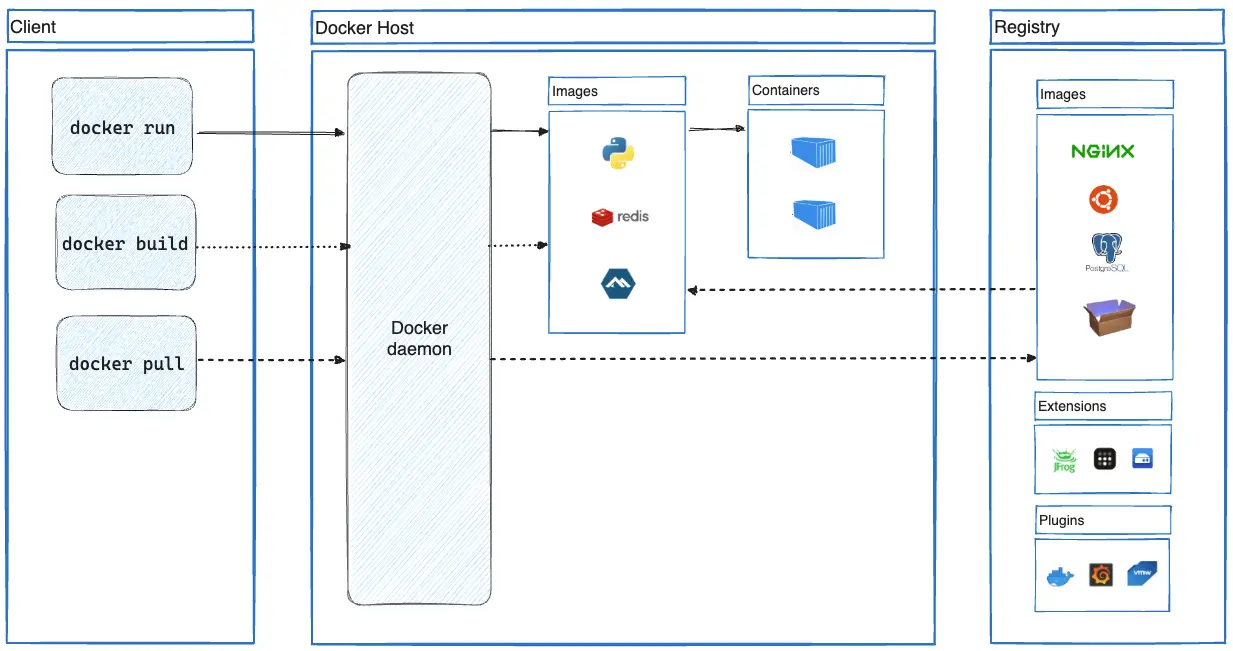
Docker Architecture
The key components in Docker are:
Docker Client: The interface through which users interact with Docker. Which is Docker CLI in this workshop.
Docker Daemon: The core service that runs on the host machine. It listens to Docker API requests and manages Docker objects such as images, containers, networks, and volumes.
Docker Images: Read-only templates used to create containers. Images are built using a Dockerfile and can be stored in a registry.
Docker Containers: Lightweight, portable, and isolated environments created from Docker images. Containers share the host OS kernel but have their own filesystem, processes, and network stack.
Docker Registries: Centralized repositories where Docker images are stored and shared. Docker Hub is the default public registry.
References
2. Docker Installation
a. Install Docker Engine
Follow the official installation guide to install Docker Engine on your machine. Or you can install Docker Engine using the installation script:
curl -fsSL https://get.docker.com -o get-docker.sh
sudo sh get-docker.sh
After installation, verify Docker is running by executing:
docker --version
b. Post installation
Since Docker requires root privileges, it is recommended to follow the official
post-installation steps to run Docker
commands without sudo.
Essentially, you need to add your user to the docker group:
sudo usermod -aG docker $USER
And then apply the changes to group:
newgrp docker
Finally, verify that you can run Docker commands without sudo:
docker run hello-world
3. Demo 1: Install ROS2 Humble via Docker
Install ROS is as easy as running a single command:
docker run -it osrf/ros:humble-desktop-full
This command;
pulls the image if not available locally
creates and runs a container
attaches an interactive terminal to the container (
-itflags)
After sourcing ROS2, you can varify that ROS2 is installed by running:
source /opt/ros/humble/setup.bash
ros2 --help
4. Working with Images and Containers
Open another terminal, and use the following commands to manage Docker images and containers.
docker psto list running containers, it should show something like this:CONTAINER ID IMAGE COMMAND CREATED STATUS PORTS NAMES a6f286ce8dfe osrf/ros:humble-desktop-full "/ros_entrypoint.sh …" 3 minutes ago Up 3 minutes brave_thompson
Fun Fact
Notice the funny name of the container? Docker automatically generates random names for unnamed containers using a combination of an adjective and the surname of a famous person. You can actually find the list of names in moby/moby repository.
docker imagesto list available images, it should show something like this:REPOSITORY TAG IMAGE ID CREATED SIZE osrf/ros humble-desktop-full fd45c15db49b 2 weeks ago 3.84GB
Some other commands to manage images and containers:
docker start <container_name_or_id>: Start a stopped containerdocker stop <container_name_or_id>: Stop a running containerdocker attach <container_name_or_id>: Attach to a running containerdocker exec -it <container_name_or_id> <command>: Run a command in a running containerdocker rm <container_name_or_id>: Remove a stopped containerdocker image rm <image_tag_or_id>: Remove an image
Note
Since the container will stop once its entrypoint exits, when you exit the
terminal by pressing Ctrl+D, the container will also stop. You can
restart it using docker start and then attach to it using
docker attach.
References
5. Demo 2: Create a Custom Docker Image
I heard that vim is your favorite text editor, and you prefer htop to
monitor system resources instead of top. Unfortunately, since none of these
tools are included in the ROS Docker image. Luckily, Docker allows us to
create your own custom images that include these tools so you don’t have to
install them every time you start a new container.
Docker uses a file called Dockerfile to define how to build an image. This
file contains a series of instructions that Docker uses to create the image.
First create a new
Dockerfilewith the following content:
1# based on ROS Humble
2FROM osrf/ros:humble-desktop-full
3
4# install additional packages
5RUN apt-get update && apt-get install -y \
6    htop \
7    vim \
8    && rm -rf /var/lib/apt/lists/*
Run
docker buildin the directory containing theDockerfile:docker build -t my-ros:humble .
This command;
Reads the
Dockerfilein the current directory (.)Builds the image and tags it as
my-ros:humble
Verify the image is built using
docker images, it should show something like this:REPOSITORY TAG IMAGE ID CREATED SIZE my-ros humble 910d5986f63a 7 minutes ago 3.88GB osrf/ros humble-desktop-full fd45c15db49b 2 weeks ago 3.84GB
Finally, we can test our custom image by running a container from it:
docker run -it my-ros:humble
And you should be able to use
vimandhtopwithout installation inside the container.
References
6. Container Runtime Environment
As mentioned in 1. So What Exactly is Docker?, Docker containers are isolated environments that run applications. The isolation includes:
Filesystem: Each container has its own filesystem, which is a copy of the image it was created from. Changes made inside the container do not affect the host filesystem or other containers.
Processes: Containers run their own processes, which are isolated from the host and other containers. This means you can run multiple instances of the same application without conflicts.
Network: Each container has its own network stack, allowing it to have its own IP address and ports. Containers can communicate with each other through defined networks or by exposing ports to the host.
Environment Variables: Containers can have their own set of environment variables, which can be set at runtime. This allows you to configure the application running inside the container without modifying the image.
And many other mechanisms to ensure the host and containers are isolated from each other.
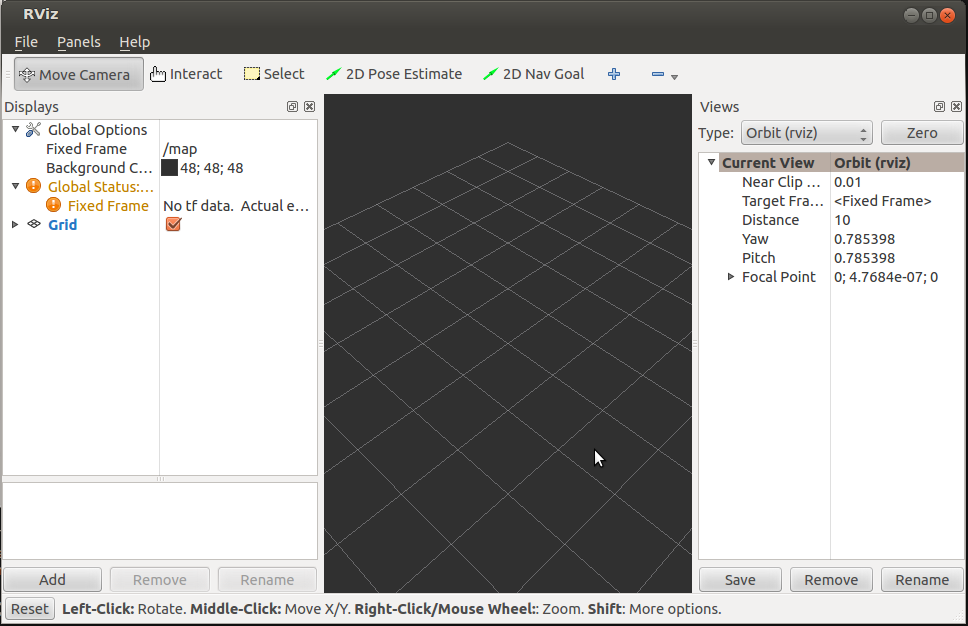
For example, when running rviz2 in the container we just created after
sourcing ros:
source /opt/ros/humble/setup.bash
rviz2
It will not work with the following error messages:
qt.qpa.xcb: could not connect to display
qt.qpa.plugin: Could not load the Qt platform plugin "xcb" in "" even though it was found.
This application failed to start because no Qt platform plugin could be initialized. Reinstalling the application may fix this problem.

Available platform plugins are: eglfs, linuxfb, minimal, minimalegl, offscreen, vnc, xcb.

Aborted (core dumped)
This is because the container does not have access to the host’s display server
(X11) by default. To run GUI applications inside a Docker container, you
need to run the container with the following command:
# allow the container to access the host's display
xhost +local:docker
docker run -it \
    --env DISPLAY=$DISPLAY \
    --env QT_X11_NO_MITSHM=1 \
    --volume /tmp/.X11-unix:/tmp/.X11-unix \
    my-ros:humble
This command;
Sets appropriate environment variables (
--envflag), notablyDISPLAYto the same value as the host’s display.Mounts the host’s X11 socket into the container (
--volumeflag), allowing the container to communicate with the host’s display server.
Essentially, specifying this flags losens the isolation between the container and the host. Besides mounting host’s directories, you can also bind the host’s ports to the containers’, or share host’s GPU, etc. to suit the needs of your application.
Finally rviz2 should work as expected.
7. Demo 3: Docker Compose
But don’t you think that running containers with all these options is a bit
tedious? Fortunately, Docker provides a tool called Docker Compose that
allows you to define the runtime configurations of containers using a YAML file
called docker-compose.yaml so you don’t have to remember all the options
and flags.
Let’s use Docker Compose to keep the configs required for running rviz2.
Create a new file named
docker-compose.yamlwith the following content:1services: 2 ros: 3 image: my-ros:humble 4 container_name: my_ros 5 tty: true 6 stdin_open: true 7 environment: 8 - DISPLAY=${DISPLAY} 9 - QT_X11_NO_MITSHM=1 10 volumes: 11 - /tmp/.X11-unix:/tmp/.X11-unix
Run the following command to start the container defined in the
docker-compose.ymlfile:docker compose up -d
This command;
Reads the
docker-compose.ymlfile in the current directoryCreates and starts the container named
my_rosdefined in the file in detached mode (-dflag)
Verify the container is running using
docker ps, it should show something like this:CONTAINER ID IMAGE COMMAND CREATED STATUS PORTS NAMES 93e64951f4dd my-ros:humble "/ros_entrypoint.sh …" 3 minutes ago Up 3 minutes my_ros 76780735b1d3 my-ros:humble "/ros_entrypoint.sh …" 12 minutes ago Up 12 minutes wizardly_boyd a6f286ce8dfe osrf/ros:humble-desktop-full "/ros_entrypoint.sh …" 21 minutes ago Up 21 minutes brave_thompson
Finally, we can test the newly created container by running:
docker exec -it my_ros bash
This command runs a interactive terminal in the container named
my_ros. Andrviz2should work after sourcing ROS2:source /opt/ros/humble/setup.bash rviz2
References
8. Conclusion
In this workshop, we explored the fundamentals of Docker, including itsarchitecture, installation, and practical use cases. We demonstrated how to:
Install and configure Docker on a Linux system.
Run and manage containers using Docker CLI commands.
Create custom Docker images tailored to specific needs.
Use Docker Compose to simplify container runtime configurations.
By leveraging Docker, you can ensure consistent, portable, and efficient development and deployment environments. Whether you’re working on robotics applications, web services, or any other software, Docker provides the tools to streamline your workflow and eliminate environment-related issues.